How to easily create a WordPress website with Divi Themes as a small business owner in just 4 hours.
A beginner’s guide
Ready to take your small business online but don’t know where to start? In this step-by-step guide, I’ll show you how to create a professional, fully-functional website in just 4 hours, even if you have zero technical experience. Save time, save money, and build a website that attracts customers and boosts your business 🤩

Let’s be honest for a second here, sometimes I totally feel like small business owners are expected to be superheroes.
We’re supposed to do it all—manage the business, handle marketing, serve our customers, and keep everything running smoothly.
Oh, and did I mention we’re also supposed to build and maintain our own websites? As if we don’t already have enough on our plates! 🤯
I remember thinking exactly that when my boyfriend came to me three years ago with this brilliant idea: “Hey, why don’t you build a website for my new business?” My reaction? Okaaaay…what? 😅
Here’s the thing: My boyfriend is much better friends with technology than me. In fact, technology and me are more like distant acquaintances who nod politely at each other from across the room.
But I knew deep down that I could probably do a better job than him. He might be a whiz with tools, but let’s just say when it comes to design and words, well, let’s just say those aren’t his strong suits… 😅
So, I sat down in front of my computer and stared at the blank screen for a moment, wondering where to even begin.
I could’ve thrown in the towel right there, but instead, I thought, Alright, YouTube, don’t fail me now. And wouldn’t you know it, I found a 4-hour video that claimed it could guide me step-by-step through building a WordPress website.
Now, when I say I knew nothing about websites, I mean nothing. I didn’t know a favicon from a favicon. H1, H5—no idea. Margin versus padding? They might as well have been speaking a different language.
But the beauty of YouTube tutorial videos was that I didn’t need to know any of that. They break down everything in a way that was super easy to follow, even for a complete newbie like me.
And you know what? By the end of those four hours, I had a website. A real website. It wasn’t perfect, but it was professional enough that our friends (who might’ve been trying to make me feel good) said it looked great! 😂
Creating a website might seem like a huge job, but I swear you can get it done in just 4 hours! In this short guide, I’m going to show you all the tools I use to create a website and why it is really possible to build one in just 4 hours.
Table of contents
Infiltration plan – how to create a website for your small business quick and easy
Let’s call creating a website an Infiltration Plan, and our objective is to securely enter and navigate the tech world like a native in just 4 hours. I might be a bit dramatic here 😅, but trust me—it’s possible.
Here’s how our Infiltration Plan is going to look:
- Buy hosting at All-Inkl (they also offer domains)
- Install WordPress
- Install the Divi Website Builder
- Download a website layout you like and insert your own text and pictures
- Install essential plugins
- Optimize for Google
- DONE!
Just 7 steps—easy peasy 😎
Now, let’s dive into each step.
How to choose and buy hosting with all-inkl for your website
Step 1: Buy Hosting at All-Inkl (They Also Offer Domains).
In my last three years of building professional websites (since my triumphant first attempt), I’ve worked with various hosting and domain providers. Whenever someone hears “domain,” they all seem to run to GoDaddy as if it’s the only provider. I have to give credit to their marketing team—they’ve really made a name for themselves.
But the reality is that GoDaddy is not the only platform and by faaaaaaaaaaar not the cheapest one. In fact, you can get your domain included with your hosting (which is the space on the internet where your website will be located). What’s even better, with All-Inkl, you can get THREE domains included with your hosting! THREE DOMAINS!!! That means three websites! So, if you decide to block multiple URLs for your website (let’s say .com and .at), or if you want to create an additional website, like one serving as an invitation to your wedding (maybe what we did 🤭), you don’t need to pay extra!
So yes, if you ask me, it’s an amazing deal and you should take it!
How to set up hosting and register a domain at All-Inkl.com, a step-by-step guide.
Go to all-inkl website and select the payment plan that works best for you. Then press Start Now and you will be redirected to the registration website. Complete the required 4 steps and you will receive an email with the login information to the members area.
When in the members area in order to register a domai go to Domain Administration, and select New Domain. Type in the domain name you’d like to have, select the desired high level domain (e.g. .com) and press Next. On the next page click “As a free inclusive domain: all-inkl PrivatPlus” and when you are ready to order, click Order.
Congratulations! You are now a proud owner of your own domain 😊 Next step is to make sure your domain is secure.
How to set up hosting and register a domain at All-Inkl.com, a step-by-step guide.
In order to secure your website, you need an SSL certificate. An SSL certificate is a digital security measure that encrypts data between your website and its visitors, ensuring that all information exchanged (like passwords and credit card details) remains private and secure.
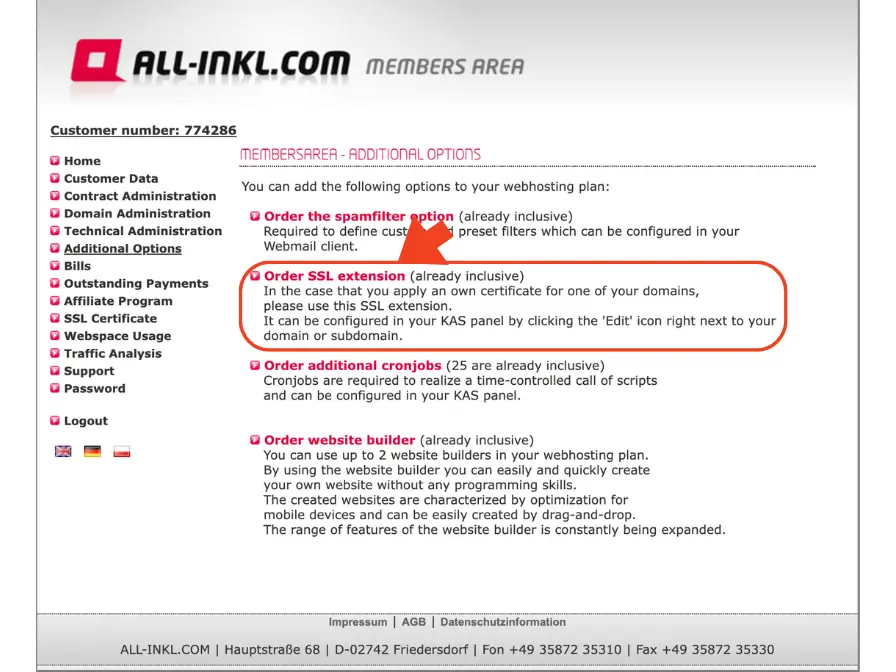
If your payment plan didn’t include the SSL certificate, you need to go to Additional Options and choose Order SSL Extension. Follow the isntruction to complete the purchase.
Once purchased we need to activate the SSL certificate.
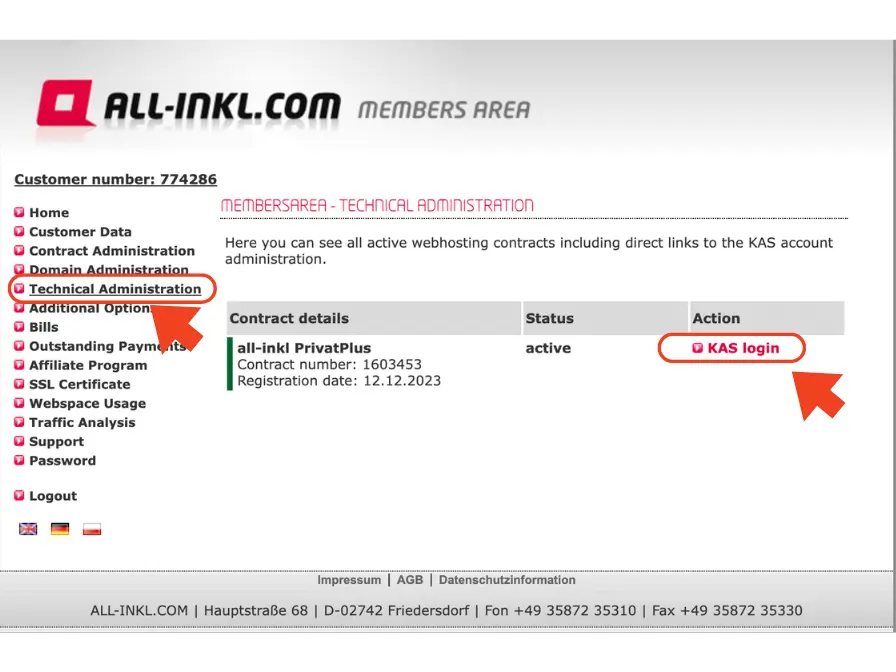
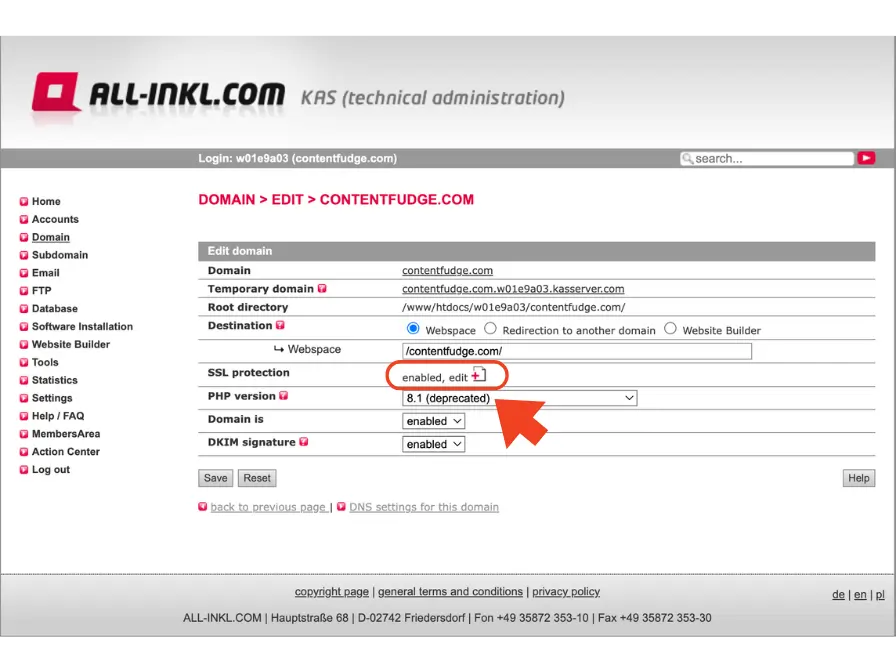
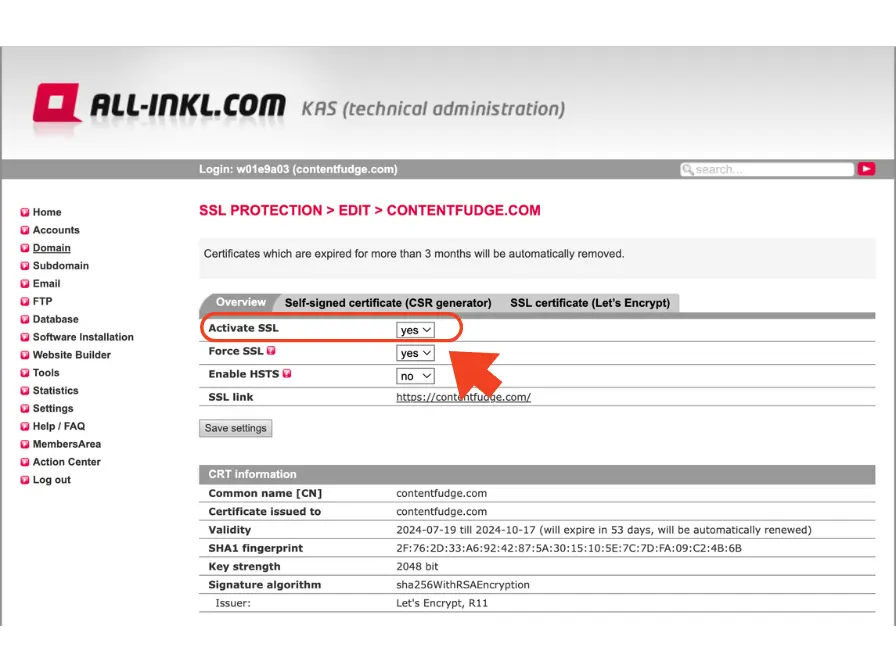
To activate the SSL certificate at all-inkl, go to Technical Administration, and press KAS login. You will be redirected to the KAS (technical administration) area. There, go to Domain and press to Edit your domain. On the new page find SSL protection and press Edit. Inside, select yes to activate the SSL certificate.
Easy WordPress installation guide for beginners
Step 2: Install WordPress
Once you’ve registered your domain at All-Inkl, you’ll need to install WordPress for that domain.
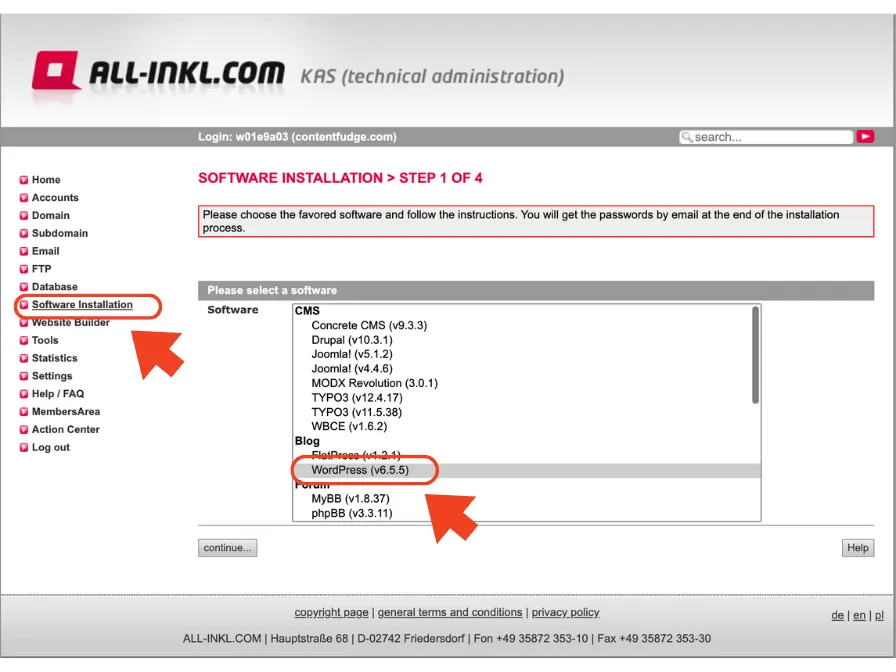
It all happens inside the All-Inkl members area, and there are plenty of instructions on how to do it.
But here’s a quick summary: Go to Software Installation, find WordPress in the list, press Continue, and on the next page, choose your domain. After that, you’ll need to set up your login information, and voila!
You have a self-hosted WordPress website with your own domain that costs less than €50 per year!!!
After installing WordPress on your domain you will receive and email with your login information. To login to the backend (control side) of your website you can go to www.yourdomain.com/wp-admin and input your login credentials.
Why you should install Divi Website Builder and how to do it
Step 3: Install the Divi Website Builder
Okay, now you have your self-hosted WordPress website with a perfect domain. You can always access the backend (the admin area) of your website by typing www.yourdomain.com/wp-admin.
Now what? WordPress is just a content management system, but it doesn’t have its own website builder.
Those usually come with a theme you choose. But which one should you choose? There are sooooo many of them, and they all have great marketing teams working on their promotion 🤣 No worries, I got you!
In my three years of building websites professionally (again, since that triumphant first try), I’ve worked with Enfold themes, Elementor, free WordPress themes, and some themes developed by some Serbian guys whose brand name I can’t remember 🫣.
Anywho, they were all okay, but something always rubbed me the wrong way.
Take Elementor, for example—it can do so much, and again, great marketing team, but their websites always load sooo slowly.
Elementor is a very heavy theme and requires so many additional plugins that it’s a nightmare.
A client of mine had an Elementor website (that I didn’t build). When I tried to install Meta tracking on his website, the Meta plugin wasn’t compatible with Elementor, so his homepage went white. All of it! Just white, poof, as if there was never a website. I mean, what’s up with that!?
Plus, you’ll have to pay almost a hundret euro every year which eventually adds up to quite an expensive website.
So yeah, the speed of your website is super important. Plus, all the additional functionalities like tracking or WooCommerce that you will need as your business grows are essential to consider in the beginning.
So no, don’t use a theme just because they have a great marketing team—take my word for it 😎.
What theme do I use for all the websites that I build now? Divi Elegant Themes.
Divi is sooooo versatile, and their pre-built websites are so pretty and professional that I wonder if I’ll even have a job in a few years because anyone can build a website with their website layouts.
Just look at them, they are gorgeous! And the best part? All you need to do is plug in your own text and pictures, and voila again!
Don’t get lost on their website though—all you need to do is go to Pricing, choose the option you like, and I honestly recommend buying the lifetime option.
Pay once and forget about it.
Plus, they have a summer sale now, so hurry up!
The awesome thing is that they have great support, who answer all my stupid questions (and I ask a lot of those), and they gladly give me recommendations for third-party tools and other technical tips on how to improve the websites I build.
So all in all, awesome.
Just for comparison, you have to pay over €40 every half a year for Enfold customer support, which is downright crazy!!!
Anyhow, Divi is really my number one choice for building a website, So if you are looking for the best website builder for small business I genuinely recommend it to you too!
How to download, customize, and launch your website layout with Divi
Step 4: download a website layout you like and insert your own text and pictures
Now that you’ve signed up for Divi Themes (which was the right decision, btw), all you need to do is choose a website layout you like. To browse their website library, go to their website, click on Divi, and find the 2000+ layouts. That’s right—there are over 2000 website options to choose from.
Don’t let the branding of their website layouts make you doubt; you can change it.
In fact, once you select the layout you like, you can set up your colors, fonts, and logos in the global settings, so the whole website adapts to your branding!
How to install Divi Website Builder on your WordPress website
To install the theme, go to your WordPress backend, find Appearance, click on Themes, click on Add New Theme, and find the Divi file you saved on your computer.
Once the theme is installed and activated, go to Pages, click on Add New Page, and select Choose the Premade Layout. Find the layout you liked and install it.
And there you go! You have your first website page on your own domain on your own self-hosted WordPress website. How crazy easy was that?
Now you can customize the pages as you like, write your texts, and add your pictures. This is where your inner website designer can really shine—make your website look exactly the way you want it 😊.
To customise your Divi website, go to Divi, and press Theme Customizer. There you will find different functions that you can customise. The most important ones are General Settings, Buttons and Homepage Settings.
In the Homepage Settings it is important to assign which one of your pages will be your homepage and which one is your blog page if you have one.
Essential WordPress plugins you need to install right away
Step 5: Install essential plugins
What are plugins? Plugins are what give your website extra functionality.
So right now, your website is just text, pictures, and maybe a few fancy animations. But plugins allow your website to collect emails, book appointments, sell products, display pop-ups, show cookie banners, and much, much more.
Most of the plugins you’ll need at this stage are free. Below is a list of all the free plugins I use for myself and my clients.
The only plugin I pay for is Complianz Privacy Suite (GDPR/CCPA) Premium because it generates and automatically updates the Privacy Policy. Since I want my website to be legally compliant and do everything right, I choose to pay for it.
Here’s the list of essential plugins:
- Cookies: Complianz GDPR/CCPA Cookie Consent
- Terms and Conditions: Complianz – Terms and Conditions
- SEO: Yoast SEO
- Security: WP Armour – Honeypot Anti-Spam + Antispam Bee
- Performance: W3 Total Cache
- Backup: UpdraftPlus – Backup/Restore
- Additional Protection: Really Simple SSL
- Image Optimization + Lazy-loading: Smush
- Contact Form for Blog: Contact Form 7 + Flamingo or WPForms
- Tracking Google: GTM4WP – A Google Tag Manager (GTM) plugin for WordPress
- Tracking Meta: Facebook for WooCommerce
- Translation: Polylang
- Store: WooCommerce
At this stage (the very beginning), you don’t need to worry too much about all these plugins.
I’d recommend you use the free Complianz plugins to set up your legal pages and cookie banner, and install the security, performance, and backup plugins.
The rest you’ll need once you cross that bridge from beginner website builder to intermediate marketer, and you want to launch ad campaigns that track customers’ activity and behaviour 😵💫.
How to optimize your WordPress website for google search
Step 6: Optimize for Google
The last step before you launch your brand-new, professionally-looking website is optimizing it for search engines.
Why? Because we want your website to be found on Google by people who want to pay you. Yes, there are people who will want to pay you—willingly 😜. So how can we make sure they find us?
For that, you’ll need a plugin (and now you know what plugins are! 🤩) called Yoast SEO.
Yoast SEO is the best and easiest-to-use SEO plugin that sets up your page for SEO success.
How? With it, you can add necessary keywords not only in the texts and headlines on your page but also where nobody but Google can see them.
Essentially, the Yoast SEO plugin creates signals around your page that tell Google what your page is about. Of course, you’ll need to create those signals by defining what keywords you want your page to rank for, but the heavy lifting will be done by Yoast SEO.
There are plenty of articles on how to optimize your website for search engines, and soon I will add one more to the piggy bank, but for now, if you want to read more about Yoast SEO and how to use it, just ask Google 🙂
DONE!
Your website is done and ready for launch!
If you got this far, it’s truly incredible considering all the mumbo jumbo I wrote here, which were probably the worst website creation instructions you could have found.
But hey, you did it, and I’m proud of you!
Looking back, I realise how intimidating building a website seemed at first, but also how much easier it was than I ever expected.
So, if you’re feeling overwhelmed at the thought of building your own website, trust me, I get it. But don’t let that stop you.
Maybe, if you try it, you’ll like it so much that you’ll end up doing it professionally. Just like I do it now 😊
And remember, if you need a second pair of eyes on your design? Drop me a message, and I’ll give you personalised feedback.
If you are stuck on a particular step? Let’s hop on a quick call, and I’ll walk you through it.
And if you’re ready to go pro, I can build your website for you at a fraction of what others charge (€1500 + VAT)! (which is crazy in comparison to other prices, but to be honest, it’s so simple to build a website with Divi Themes that I just feel bad charging more 😅)
So whatever you choose, I wish you fun creating your own website, and with any questions, I’m here for you 🫶.
Anzhelika from Content Fudge 🍪
Get Sunday Fudge straight to your inbox.
Real social media and marketing, brand communication insights, and personal failures 🙆♂️

Book a free discovery call
Book a free discovery call with me and I’ll guide you through the website creation process 😉


